
Calibrating a monoblock filling machine is a critical process that ensures product quality, operational efficiency, and regulatory compliance. While it may seem technical, following a structured approach—preparation, measurement, adjustment, and verification—can make the process manageable and highly effective.
Regular calibration, combined with proper maintenance and operator training, will not only improve accuracy but also extend the lifespan of your equipment and enhance overall production performance.
Why Accurate Calibration Is Essential
Before going through the calibration steps, it is crucial to first understand the importance of calibration.
- Product Consistency: Guarantees each bottle is filled to the precise target volume.
- Regulatory Compliance: Meets legal standards in industries like food, beverage, and pharmaceuticals.
- Cost Control: Prevents overfilling (waste) and underfilling (customer complaints).
- Machine Longevity: Proper calibration reduces strain on components.
- Brand Reputation: Consistent quality builds consumer trust.
Types of Filling Systems in Monoblock Machines
Calibration methods depend on the type of filling system used. The most common types include:
Gravity Filling Systems
- Suitable for low-viscosity liquids (e.g., water, juice).
- Relies on gravity flow; controlled by timing and flow rate.
Volumetric Filling Systems
- Uses pistons or flow meters to measure exact volumes.
- Common in both food and pharmaceutical industries.
Pressure Filling Systems
- Used for carbonated beverages.
- Requires pressure balance between tank and bottle.
Level Filling Systems
- Ensures consistent fill height rather than volume.
- Ideal for clear or transparent packaging.
Recognizing the specific type of machine you have is key to successful calibration.
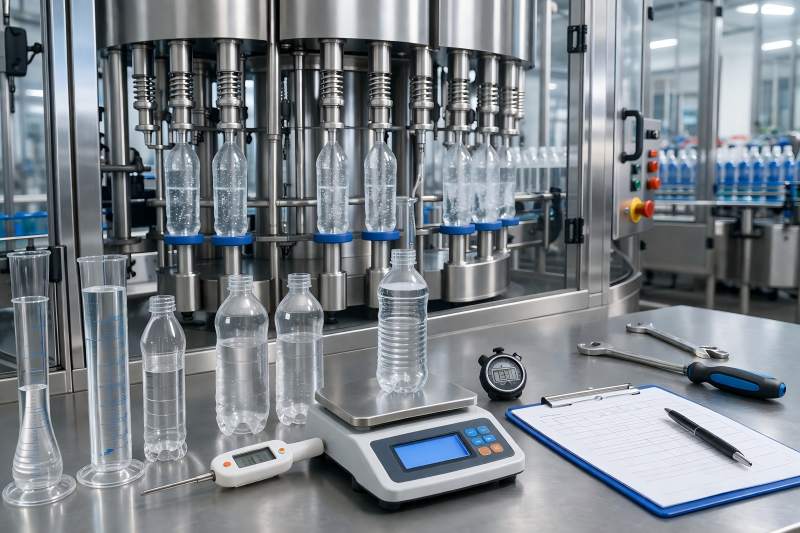
Tools and Equipment Required
Proper calibration requires accurate measurement tools. Below is a reference table:
| Tool/Equipment | Purpose |
| Graduated Cylinders | Measure liquid volume precisely |
| Digital Weighing Scale | Convert weight to volume (for density-based) |
| Stopwatch | Measure fill time |
| Calibration Containers | Standardized vessels for testing |
| Thermometer | Monitor liquid temperature |
| Flow Meter (optional) | Measure flow rate |
| Adjustment Tools | Wrenches, screwdrivers for fine-tuning |
Pre-Calibration Preparation
Before starting calibration, ensure the machine and environment are properly prepared:
Clean the Machine
- Remove any residue or contaminants.
- Perform CIP (Clean-In-Place) if available.
Check for Mechanical Issues
- Inspect valves, seals, and nozzles.
- Replace worn-out components.
Stabilize Operating Conditions
- Ensure consistent liquid temperature.
- Maintain steady pressure levels.
- Use the actual product or a liquid with similar properties.
Warm-Up the Machine
- Run the machine for 10–15 minutes to stabilize performance.
Step-by-Step Calibration Process
Step 1: Define Target Fill Volume
Determine the exact volume required per container (e.g., 500 ml). This will be your reference point for calibration.
Step 2: Perform Initial Test Fill
- Run the machine with a small batch (e.g., 10–20 bottles).
- Collect samples from different filling heads.
Step 3: Measure Output
You can measure output in two ways:
Method A: Volume Measurement
- Use a graduated cylinder to measure liquid directly.
Method B: Weight Measurement
- Weigh the filled bottle.
- Subtract the empty bottle weight.
- Convert using density:
Volume=Weight/Density
Step 4: Record Data
Create a data table for analysis:
| Sample No. | Filling Head | Measured Volume (ml) | Deviation (ml) |
| 1 | Head 1 | 498 | -2 |
| 2 | Head 2 | 505 | +5 |
| 3 | Head 3 | 500 | 0 |
| 4 | Head 4 | 497 | -3 |
Step 5: Analyze Deviations
- Calculate average fill volume.
- Identify patterns (e.g., one head consistently overfills).
- Determine acceptable tolerance (e.g., ±1%).
Step 6: Adjust Machine Settings
Adjustment methods vary depending on machine type:
For Gravity Fillers:
- Adjust flow control valves.
- Modify fill time settings.
For Volumetric Fillers:
- Adjust piston stroke length.
- Calibrate flow meters.
For Pressure Fillers:
- Adjust tank pressure.
- Ensure proper CO₂ balance.
For Level Fillers:
- Adjust vent tube height.
Step 7: Re-Test and Verify
- Run another test batch.
- Measure again and compare results.
- Repeat adjustments until within tolerance.
Step 8: Calibrate Each Filling Head Individually
Each head may behave differently due to wear or slight variations.
- Adjust each head independently.
- Ensure uniform output across all heads.
Step 9: Document Calibration Results
Maintain a calibration log including:
- Date and time
- Operator name
- Machine settings
- Measured values
- Adjustments made
Factors Affecting Calibration Accuracy
Several variables can influence filling accuracy:
Liquid Properties
- Viscosity: Thicker liquids flow more slowly.
- Temperature: Affects density and flow rate.
- Foaming: Causes inconsistent fills.
Machine Condition
- Worn valves or seals can cause leakage.
- Nozzle clogging affects flow.
Environmental Conditions
- Temperature fluctuations
- Pressure instability
Container Variability
- Differences in bottle shape or size
- Manufacturing tolerances
Calibration Frequency
Calibration should not be a one-time task. Recommended frequency:
| Scenario | Calibration Frequency |
| Daily production starts | Daily quick check |
| After maintenance | Immediately after service |
| Product change | Before switching products |
| Regulatory requirement | As per compliance standards |
| High-precision industries | Multiple times per shift |
Common Calibration Mistakes to Avoid
Skipping Warm-Up
- Leads to unstable readings.
Ignoring Temperature Effects
- Causes inaccurate volume calculations.
Using Inaccurate Measuring Tools
- Results in false calibration.
Not Calibrating All Heads
- Leads to inconsistent output.
Over-Adjusting
- Small adjustments are more effective.
Neglecting Maintenance
- Calibration cannot compensate for worn parts.
Advanced Calibration Techniques
Automated Calibration Systems
Modern machines may include:
- Built-in sensors
- Real-time feedback systems
- Auto-adjustment features
Statistical Process Control (SPC)
- Monitor trends over time
- Detect deviations early
Digital Flow Meters
- Provide precise measurement
- Reduce manual errors
Best Practices for Long-Term Accuracy
- Establish a standard operating procedure (SOP).
- Train operators thoroughly.
- Use high-quality spare parts.
- Maintain a calibration schedule.
- Implement preventive maintenance programs.
- Keep detailed records for audits.
Troubleshooting Calibration Issues
Problem: Inconsistent Fill Volumes
Solution:
- Check for air bubbles in the system
- Inspect valves and seals
Problem: Continuous Overfilling
Solution:
- Reduce fill time
- Adjust flow rate
Problem: Underfilling
Solution:
- Increase piston stroke
- Check for blockages
Problem: Variation Between Heads
Solution:
- Calibrate each head separately
- Replace worn components
Calibration is the process of adjusting and verifying that the machine dispenses the correct volume of liquid into each container. Even minor deviations can lead to product waste, regulatory issues, customer dissatisfaction, and financial losses. Ensuring accurate calibration isn’t just about meeting technical standards—it’s vital for sustaining a competitive and profitable operation.